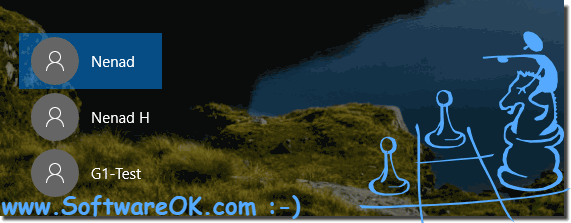
How to hide the switch user at login screen on MS Windows 10 and 11, or enable, disable, remove from Login Screen!1.) Windows 10 / 11 switch user login screen!By default is Switch User on Login screen Windows 10 and 11 has the user list at bottom left!If is not disabled: ► ... Hide / Disable / Enable the switch user at login screen!
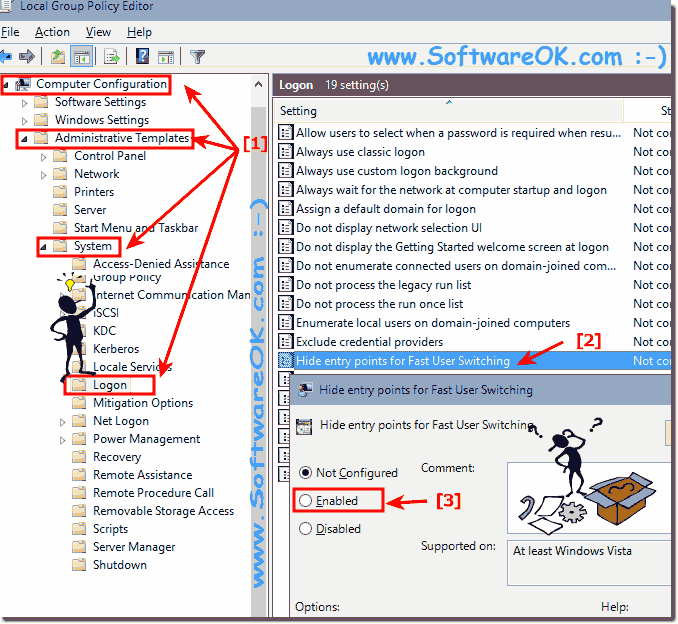
2.) Hide / Disable / Enable the switch user at login screen!Please Click the Windows 10 and 11 Start button, type gpedit.msc in the search box, and then press Enter.Or via RUN-Dialog in windows, Keyboard-Shortcut Windows-Logo+R and the gpedit.msc command! - Select Computer Configuration, Administrative Templates, System. - And click the Logon folder. - Open the Properties of Hide entry points for Fast User Switching via Double-Click! (... see Image-2 Arrow 1 and 2) And enabled, and then click Button OK. (... see Image-2 Arrow-3) This allows the Windows-10 System Administrator to hide the Switch User interface in the Logon UI, the Start menu and the Task Manager. Use gpupdate /force command to update the Policy or Logoff and Login in Windows-10! See also: ► Disable the lock screen in Windows 10 ► How to find auto startup folder in Windows 10
This Windows-10 policy setting allows you to hide the Switch User interface in the Logon UI, the Start menu and the Task Manager. If you enable this policy setting in Windows-10, the Switch User interface is hidden from the user who is attempting to log on or is logged on to the computer that has this policy applied Windows-10. The locations that Switch User interface appear are in the Logon UI, the Windows-10 Start menu and the Task Manager of Windows-10 . If you disable or do not configure this policy setting, the Switch User interface is accessible to the user in the three locations. See also: ► No Password at Hibernate ► set Windows 10 Password ◄ 3.) How to hide user accounts in windows 10 (Logon Screen ergo Lock Screen)!Content: 3a.) ... Use NET USER Activate! 3b.) ... USE wmic useraccount set disabled! From Win-10 Pro: ... Disable Windows-10 user accounts via Local Users and Groups Manager! 3a.) Use NET USER Activate!Please start the ► Windows 10 cmd.exe in administrative mode [Windows-Logo+X].
ColorConsole  [Version 2.5.1001 ]
Microsoft Windows [Version 10.0.16299.371]
(c) 2017 Microsoft Corporation. All rights reserved.

C:\Users\Nenad\Desktop>Net user User1 /active:no
The command completed successfully.

C:\Users\Nenad\Desktop>Net user User1 /active:yes
The command completed successfully.

C:\Users\Nenad\Desktop>
3b.) USE wmic useraccount set disabled!ColorConsole [Version 2.5.1001 ] Microsoft Windows [Version 10.0.16299.371] (c) 2017 Microsoft Corporation. All rights reserved. C:\Users\Nenad\Desktop>wmic useraccount where name='User1' set disabled=true Updating property(s) of '\\DESKTOP-O5PRUUV\ROOT\CIMV2:Win32_UserAccount.Domain="DESKTOP-O5PRUUV",Name="User1"' Property(s) update successful. C:\Users\Nenad\Desktop>wmic useraccount where name='User1' set disabled=false Updating property(s) of '\\DESKTOP-O5PRUUV\ROOT\CIMV2:Win32_UserAccount.Domain="DESKTOP-O5PRUUV",Name="User1"' Property(s) update successful. C:\Users\Nenad\Desktop> Finally info:
This fast user change solution ergo statement, is written on Windows 10, as you can see at the top under Windows 10 user change images. But you can easily switch user with this exchange example. Also easy to use on earlier and older versions of Microsoft's Windows operating systems when using multiple user accounts. Regardless of whether it is a Home Windows desktop PC with multiple users, or whether you are working Mobile On the road for example when tweeting or facebooking on tablet, Surface Pro/Go. Or even a server operating system it has been tested under different systems and successfully verified. FAQ 25: Updated on: 25 August 2023 13:48 |
| ||||||||||||||||||||||||||||||||||||||||||||||||||||||||||||||||||||||||||||


