|
If you want to burn a CD, or DVD from an ISO file on your Windows-10/11 OS, insert an recordable CD, Blu‑ray, DVD, or Disc into your disc burner.
Content: 1.) ... Burn a Disc from an ISO File on Windows-11, 10, ...!
|
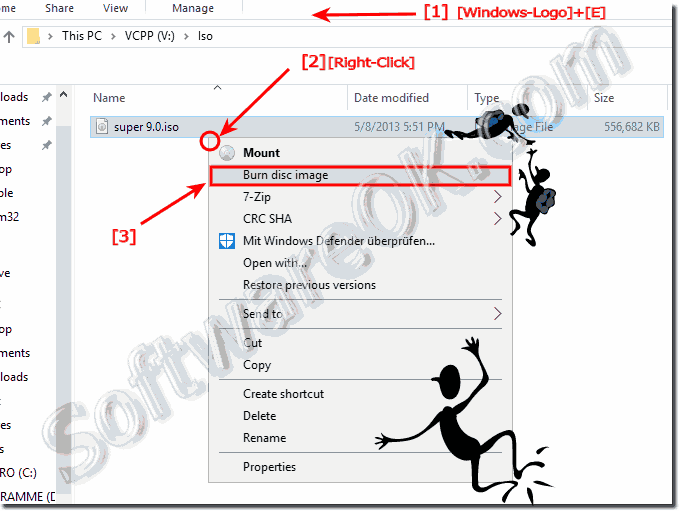
| (Image-1) Burn a CD, Blue Ray or DVD from an ISO file on Windows-10! |
 |
Useful info from (c) Microsoft ;-):
An ISO file, also called a disc image, is a single file that’s a copy of an entire data CD or DVD. When you burn a CD or DVD from an ISO file, the new disc has the same folders, files, and properties as the original disc. The most common way to get an ISO file is to download it from a website. For example, you might download and then use an ISO file to update software on your computer. You can burn a disc image file, which often has either an .iso or .img file name extension, to a recordable CD or DVD by using Windows 10 Disc Image Burner. Whether you can burn it to a recordable CD, DVD, or Blu-ray Disc depends on your disc burner and the type of discs it can burn, the size of the disc image file, as well as the device on which you plan to use the disc.
2.) Burn Data via the MS Explorer on Windows-10!
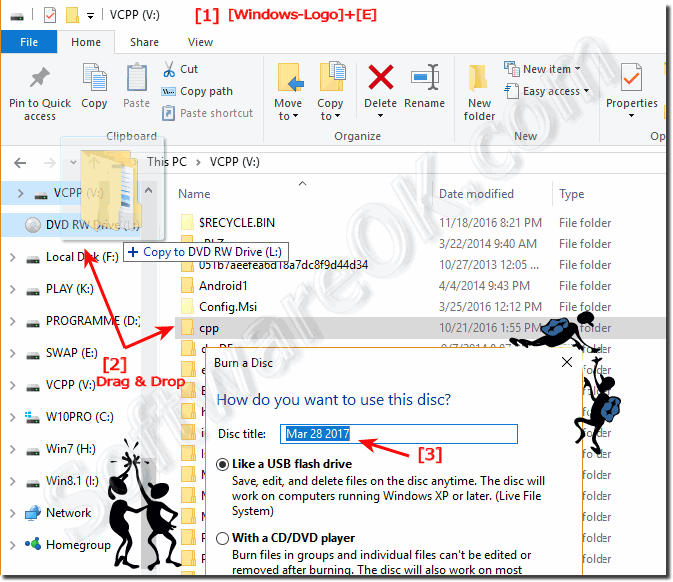
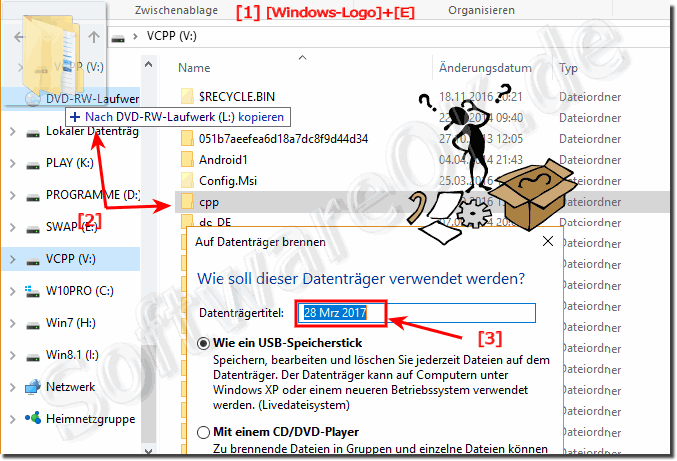
Open the MS Explorer. for example Shortcut Windows + E, select the data to be burned and drag and drop it to the DVD-RW drive. Now you can add a name for the Windows 10 Disc Image! (... see Image-2 Point 1 to 3)You can also use copy and paste! Or burn the data via the context menu and send to.
The disk will be formatted and can be treated as an USB drive or hard drive.
| (Image-2) Burn a Data CD or DVD on Windows-10! |
 |
Info:
See also: ► rename the This-PC in My-Computer on Windows 10 ► change Home Folder in Windows 10 to My Computer
This Solution to Burn a CD, Bluray or DVD from an ISO file is suitable for: Windows 10 Pro, Windows 10 Enterprise, Windows 10 Home, Windows 8.1, Windows 8.1 Enterprise, Windows 8.1 Pro, Windows 8, Windows 8 Enterprise, Windows 8 Pro, Windows 7 Enterprise, Windows 7 Home Basic, Windows 7 Home Premium, Windows 7 Professional, Windows 7 Starter, Windows 7 Ultimate, Windows Vista Enterprise 64-bit edition, Windows Vista Ultimate 64-bit edition, Windows Vista Business, Windows Vista Business 64-bit edition, Windows Vista Enterprise, Windows Vista Ultimate
See also: ► rename the This-PC in My-Computer on Windows 10 ► change Home Folder in Windows 10 to My Computer
3.) How to erase rewritable CDs / DVDs on Windows 11, 10, 8.1, ...!
Some discs, including CD-RW, DVD-RW, or BD-RE, can be erased regardless of the format in which you burn them. Windows Explorer can erase these discs for you. The startup procedure varies from Windows 10, 8.1, ... but the steps after startup are the same.
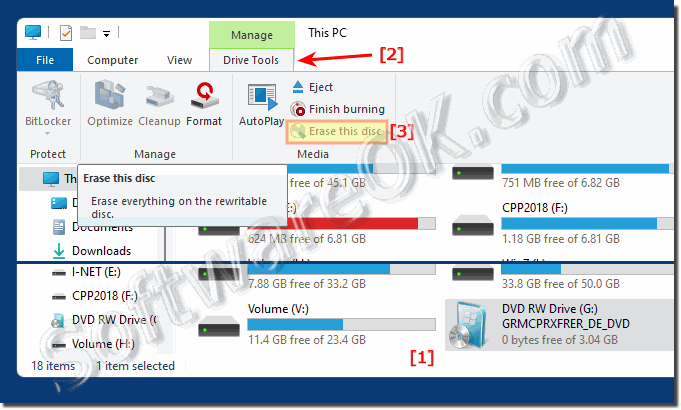
1. In Windows, open Windows Explorer and go to the Computer / This PC section.
2. Select the "Drive tools" there.
3. Mark the data carrier that you want to delete without opening it.
4. Click in the upper toolbar on "Erase the disk"
(... see Image-1 Point 1 to 3)
PS: You can also right-click on the data carrier and select the "Erase data carrier" option Disc has been erased for you. The time it takes for the process to take place depends on the amount of data on the disc, the type of disc, and your drive.
In Windows 11 wia right click Menu on DVD or:
► Enable the old File Explorer!

Content / solution / tip:
1.) ... burn a DVD or CD from an ISO file!
This short FAQ shows you how to burn a CD or DVD ISO image on Windows 10 without using third-party CD/DVD burning software how to accomplish this important task on Microsoft's Windows.
2. select the ISO file in Windows 10/11 Explorer
3. then right-click on the file
4. select the option: "Burn disk image" ( ... see Image-1 )
That's the solution ;-)

2. Select the data to be burned and drag and drop them onto the DVD-RW drive.
3. Now you can give the disc a name!
( ... see Image-2 Points 1 to 3 )
PS:
You can also work with copy and paste! Or via the context menu and send to.
The data medium is formatted and can be treated like a USB drive or hard disk.

2. Select the "Drive tools" there.
3. Mark the data carrier that you want to delete without opening it.
4. Click in the upper toolbar on "Erase the disk"
(... see Image-1 Point 1 to 3)
PS: You can also right-click on the data carrier and select the "Erase data carrier" option Disc has been erased for you. The time it takes for the process to take place depends on the amount of data on the disc, the type of disc, and your drive.
In Windows 11 wia right click Menu on DVD or:
► Enable the old File Explorer!
| (Image-3) Erase DVD on Windows! |
 |
If you want to burn a CD or DVD from an ISO file on your Windows 10/11 operating system, insert a recordable CD, Blu-ray, DVD into your burner.
Content / solution / tip:
1.) ... burn a DVD or CD from an ISO file!
2.) ... transfer data to the burner drive via MS Explorer!
3.) ... How to erase rewritable CDs / DVDs!
4.) ... More tips on Windows 11 in this topic!
This short FAQ shows you how to burn a CD or DVD ISO image on Windows 10 without using third-party CD/DVD burning software how to accomplish this important task on Microsoft's Windows.
See also: ► Password reset disk in Windows 10 ► Delete unnecessary files in Windows 10
1.) Burn a DVD or CD from an ISO file!
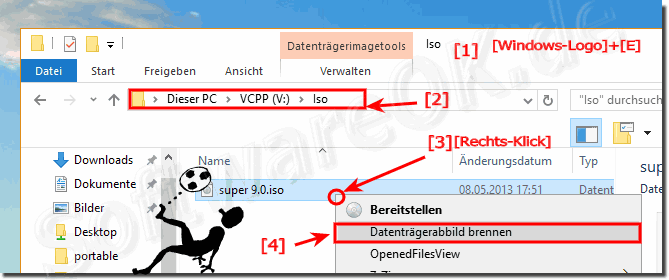
1. Open the folder "This-PC" , eg via the key combination Windows + E2. select the ISO file in Windows 10/11 Explorer
3. then right-click on the file
4. select the option: "Burn disk image" ( ... see Image-1 )
That's the solution ;-)
| (Image-1) Windows 10 burn a CD, DVD BluRay from ISO! |
 |
Info:
You can use the built-in CD/DVD burning feature of Windows 10 or Windows Media Player to burn movies, videos, music, photos, documents and other data to a CD or DVD.
This example for creating a CD, DVD, or BluRay from the ISO file is suitable for: Windows 11, 10 Pro, Enterprise, Home, Windows 8.1, Windows 8, Windows-Server 2019, 2016, 2012, Windows 7 Basic, Professional, Starter, Ultimate
2.) Transfer data to the burner drive via MS Explorer!
1. Open MS Explorer, eg shortcut Windows + E2. Select the data to be burned and drag and drop them onto the DVD-RW drive.
3. Now you can give the disc a name!
( ... see Image-2 Points 1 to 3 )
PS:
You can also work with copy and paste! Or via the context menu and send to.
The data medium is formatted and can be treated like a USB drive or hard disk.
| (Image-2) Burn data to a CD or DVD under Windows 10! |
 |
Helpful information from (c) Microsoft:
If the Windows 10 computer has a CD or DVD burner, you can copy files to a writable data carrier. This process is known as disc burning. In Windows 10, data carriers are burned in live file system format or in mastered format, depending on the selected data carrier format.
If the Windows 10 computer has a CD or DVD burner, you can copy files to a writable data carrier. This process is known as disc burning. In Windows 10, data carriers are burned in live file system format or in mastered format, depending on the selected data carrier format.
3.) How to Erase Rewritable CD/DVD on Windows 11, 10,...!
Some discs, including CD-RW, DVD-RW, or BD-RE, can be erased no matter what format you burn them in. File Windows Explorer can erase these discs for you. The startup procedure varies from Windows 10, 8.1, ... but the steps after startup are the same.
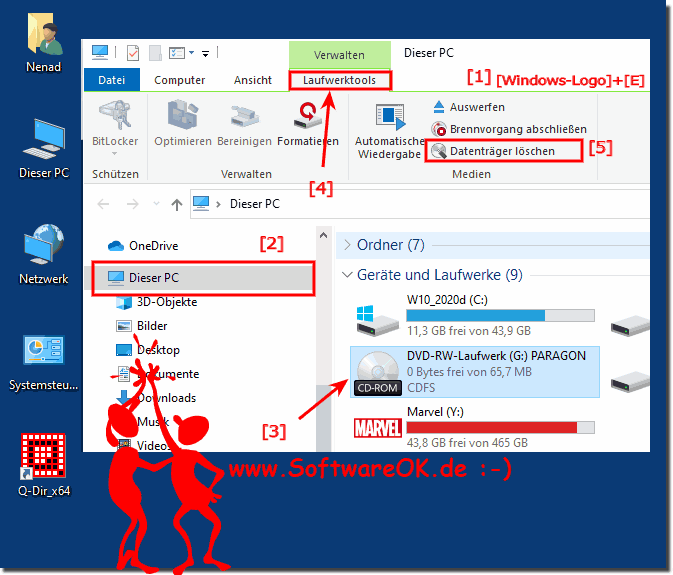
1. In Windows, open Windows Explorer and go to the Computer / This PC section.
2. Select the "drive tools" there
3. Highlight the disk you want to delete without opening it.
4. Click on "Delete Disk"
in the upper toolbar ( ... see Image-3 Points 1 to 5 )
PS: Especially with Windows 11, you can also right-click on the data medium and select the "Delete Disk" option wait for the disc to be erased for you. The time it takes depends on the amount of data on the disc, the type of disc, and your drive.

File Explorer looks different on Windows 11, here are links to the solutions if you want to use the old File Explorer and context menu (right-click menu)!
►► Open / activate the old context menu in MS Windows 11!
2. Select the "drive tools" there
3. Highlight the disk you want to delete without opening it.
4. Click on "Delete Disk"
in the upper toolbar ( ... see Image-3 Points 1 to 5 )
PS: Especially with Windows 11, you can also right-click on the data medium and select the "Delete Disk" option wait for the disc to be erased for you. The time it takes depends on the amount of data on the disc, the type of disc, and your drive.
| (Image-3) Delete from a CD, DVD or Blu-ray data carrier! |
 |
4.) ... More tips on Windows 11 in this topic!
File Explorer looks different on Windows 11, here are links to the solutions if you want to use the old File Explorer and context menu (right-click menu)!
►► Open / activate the old context menu in MS Windows 11!
►► Use the old File Explorer on Windows 11?
FAQ 170: Updated on: 25 August 2023 14:41
